Here I am going to do a step-by-step on how I make
my omelette using pictures for demonstration. Enjoy!
So first of all, I make sure that I have what I ne
ed. Here are the ingredients that I use in my omelettes, but feel free to add your own to yours:
- Eggs (3 approximately, depending on how much I want to make)
- Bell peppers (I like to use green peppers)
- Onions
- Scallions (green onions)
- Garlic
- Mushrooms
- Aged Cheddar cheese
- Salt and Pepper (I love to use Frontier’s Exotic Peppercorn Blend)
- Butter (or whichever cooking oil you prefer)
Now that we have those ingredients handy, we can start!
I start by turning the stove burner onto medium heat. And then adding some butter onto the pan.

Now, while waiting for the butter to melt a bit, I go ahead and start chopping the green peppers, onions and scallions.

Then I add them to the pan.

While these are cooking. I slice up the mushrooms and the garlic. I also like to make sure that the mushrooms cook with lots of extra butter than is already in the pan, so I slice a bit more of the butter to add it to the pan with the mushrooms and garlic.

I stir what’s already in the pan a bit until the onions look softer and the green peppers aren’t as crunchy. Now I add the other vegetables.

I let these vegetables cook a bit longer until the mushrooms look nice and brown and buttery. You can add the salt and pepper now with all of the vegetables in the pan. As I mentioned above, I love to use the Exotic Peppercorn Blend pepper instead of the generic pepper.

At this time, I start to get the cheese ready by getting out two slices of Aged Cheddar, and either chop it up as well so it melts easier, or leave it in slices. I go ahead and put the cheese onto the plate I am going to use to serve the finished omelette on.

Once I have cooked the vegetables to my liking, I put them over the cheese on the plate and prepare to cook the eggs.

Now I crack open 3 eggs onto the pan and break the yolks and spread them around the pan until it covers the bottom evenly.

Now you can add more pepper and salt if you so choose. I like to let the eggs cook a bit on the bottom before I pick the pan up and start to swivel the pan in a circle to get the eggs up onto the sides. Once I do that, the pan should look like this:

You may need to repeat that a few times to make the sides thicker. I let it cook a bit longer until the eggs in the center look more firm and less jiggly. Then I add the vegetables with the cheese back into the pan on one side of the eggs.

It’s now time to flip it in half! Flipping the eggs over onto the vegetables to create a half circle is a little bit tricky, with practice you’ll get better and better at it. At first, the eggs might break or not fold correctly, but don’t fear, it’ll get easier. What I do is grab my spatula and slip it underneath the side of the eggs without the vegetables on it—making sure the spatula is almost all the way underneath it and centralized—I flip it over!
Now it should turn out like this. Again, practice makes perfect.

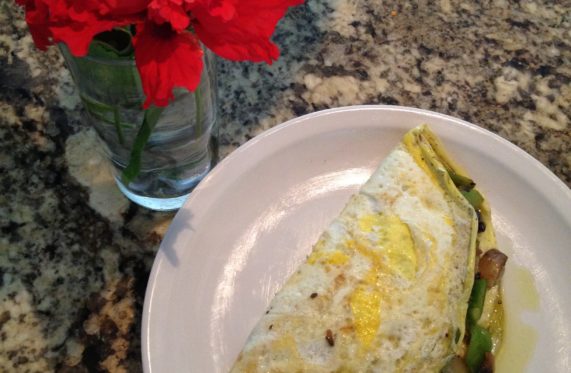
I let it cook like this until some of the cheese is visibly melting from the sides. After that, slip it onto a plate ’cause it’s ready to serve! 🙂

I hope you enjoyed this and I hope it turns out yummy for you! Thanks for reading!
Love,
Mariah June
Yumi!!! I want one 😀
I wanted to thank you for this very good read!!
I certainly loved every bit of it. I have got you bookmarked to check out
new stuff you post…
Thank you so much! Glad you liked this!
Bel article, je l’ai partagé avec mes amis.
Merci! Je suis content que vous l’aimiez!
Very nice post. I just stumbled upon your blog and wanted to say that I have truly enjoyed browsing your blog posts.
After all I will be subscribing to your rss feed and I hope you write again very soon!
Hi there, yes this article is truly good and I have learned lot of things from
it about blogging. thanks.
Hello, I think your blog might be having browser compatibility issues.
When I look at your website in Chrome, it looks fine but when opening in Internet Explorer, it has some overlapping.
I just wanted to give you a quick heads up! Other then that,
fantastic blog!
I think this is among the most significant info for me.
And i am happy reading your article. However wanna statement on few basic issues, The site
taste is perfect, the articles is really excellent : D. Just right job,
cheers